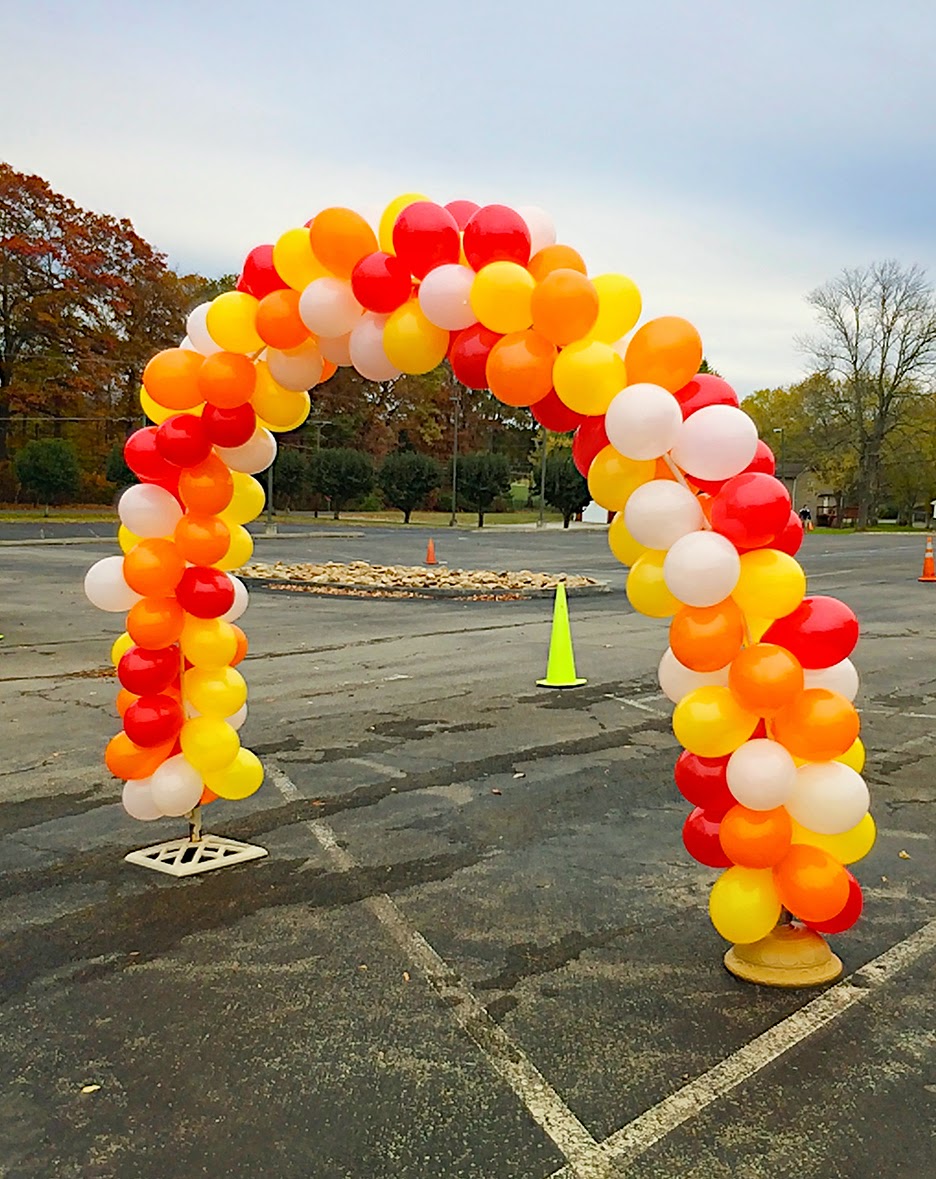
Putting together a balloon arch can really make any gathering feel special, giving it a touch of whimsy and a lot of cheer. Whether you're getting ready for a birthday celebration, a baby shower, or maybe even just a fun get-together with friends, a lovely arch made of balloons is a wonderful way to greet your guests. It’s a decorative element that pretty much everyone notices and often remembers.
You might think making one of these beautiful displays is a bit complicated, or that it takes some kind of special knack, but that's not really the case. With just a few basic items and some easy-to-follow steps, you can create a stunning balloon arch that looks like it came straight from a professional event planner. It's truly a project that anyone can tackle, even if you don't consider yourself particularly crafty, so.
This guide is here to walk you through each part of the process, from picking out your balloons to getting that perfect shape. We'll talk about what you need to gather, some handy tips to make things go smoothly, and how to put it all together so it stands tall and looks fantastic. Pretty much, you'll be a balloon arch pro in no time, you know?
- Teresa Sprinkle Cookies
- Really Hairy Lesbians
- Jayda Wayda Braids
- Receta De Naranja Asada Para La Tos
- Deaths Obsession Book 2
Table of Contents
- What Materials Do You Need to Make a Balloon Arch?
- Picking Your Balloons for How to Make a Balloon Arch
- Getting Your Balloons Ready for How to Make a Balloon Arch
- Is There a Trick to Inflating Balloons Just Right?
- Assembling the Basic Structure of Your Balloon Arch
- How Do You Attach Balloons to the Strip?
- Shaping and Setting Up Your How to Make a Balloon Arch
- Adding Those Extra Touches to Your Balloon Arch
What Materials Do You Need to Make a Balloon Arch?
Before you get started on your creative project, it's a good idea to have all your supplies laid out. Having everything close by means you won't have to stop midway through your work, which can be a bit frustrating, honestly. Think of it like preparing for a cooking adventure; you gather all your ingredients first. This way, the whole process feels much more relaxed and enjoyable, that's for sure.
You will need a fair number of balloons, of course. The exact count really depends on how big you want your arch to be and how full you want it to appear. It's often a good idea to get a few extra, just in case some pop or don't quite look right. Variety in balloon sizes and colors can make your arch look much more interesting, too. A mix of small, medium, and larger balloons adds a nice sense of depth and texture, you know?
Next up, you'll want a balloon decorating strip. This is basically a long, flexible plastic strip with small holes or slots along its length. It's what you'll use to connect all your balloons together and give your arch its shape. You can find these at most party supply stores or online, and they're pretty inexpensive, actually. They really make the job of putting the arch together a lot simpler than trying to tie everything with string, for example.
- Is The Glow Recipe Toner Good For 12 Year Olds
- How To Do Glambot At Home
- Terrance Howard Mayne
- People Who Talk To Themselves Club
- Ray Models For Clothing Brand
An air pump is another item that will save you a lot of breath and time. While you could blow up each balloon by mouth, it gets tiring very quickly, and your cheeks will definitely feel it. A hand pump works well for smaller projects, but if you're making a big arch, an electric pump is truly a lifesaver. It inflates balloons in seconds, which means you can get through the setup much faster, basically.
You'll also want some glue dots or low-temperature hot glue. These are for attaching smaller balloons or decorative elements to the main arch, filling in any little gaps and making it look really full and polished. Some string or fishing line can be handy for hanging the arch once it's done, or for securing it to a wall or frame. And a pair of scissors is always useful for cutting string or opening packages, as a matter of fact.
Picking Your Balloons for How to Make a Balloon Arch
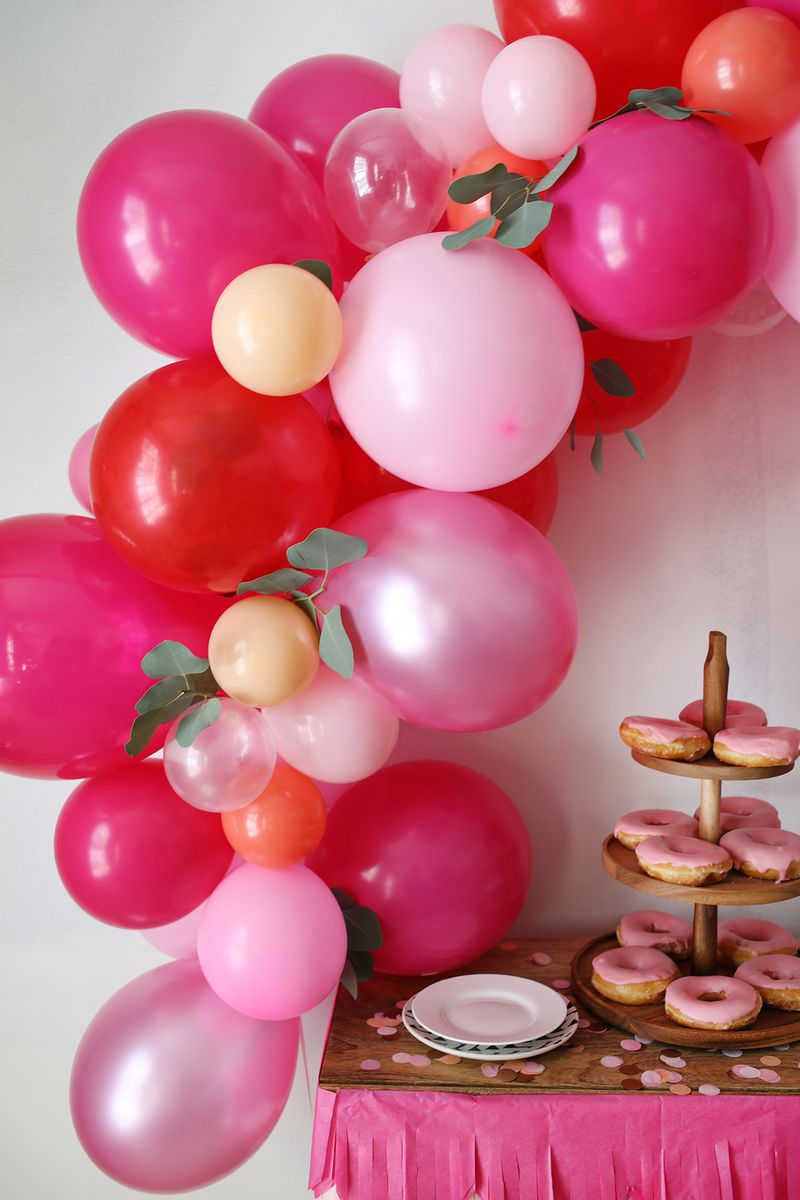
Choosing the right balloons is a fun part of learning how to make a balloon arch. The colors you select will set the mood for your entire event, so think about the overall theme or the colors of the space where the arch will be. You might go for bright and cheerful shades for a child's party, or perhaps softer, more muted tones for something like a baby shower or a more elegant gathering. It's really all about what kind of feeling you want to create, as I was saying.
Consider using balloons of different sizes. This adds visual interest and makes your arch look more professional and less like a simple line of balloons. You can find balloons in many different diameters, from tiny ones that are just a few inches across to much larger ones that really make a statement. Mixing these sizes together creates a lovely, organic shape that is very pleasing to the eye, you know.
The type of balloon also matters. Latex balloons are the most common choice for arches because they're flexible and come in a huge range of colors. You can also find metallic or pearlized finishes that add a bit of sparkle. Foil balloons, which come in specific shapes or numbers, can be added as accents, but they usually aren't the main material for the arch itself, as a matter of fact. Just make sure whatever you pick works well together.
Don't forget to think about the quality of your balloons, too. Cheaper balloons might pop more easily or lose their air faster, which can be a bit disappointing after all your hard work. Investing in slightly better quality balloons can make a big difference in how long your arch lasts and how good it looks. It's worth a little extra to ensure your creation stays beautiful throughout your event, basically.
Getting Your Balloons Ready for How to Make a Balloon Arch
Once you have all your materials, the next big step is getting your balloons inflated. This is where your air pump comes in really handy. If you're doing a lot of balloons, which you will be for an arch, it's a good idea to set up in a comfortable spot where you have plenty of room to work. You'll be doing this for a little while, so comfort matters, you know?
Start by inflating your largest balloons first. These will form the main structure of your arch. You don't want to overinflate them, though, as they can pop easily, and that's always a bit startling. Inflate them until they are full but still have a little give when you gently squeeze them. This little bit of softness helps them fit together better on the decorating strip, and makes them less likely to burst, too.
After the largest ones, move on to your medium-sized balloons, and then finally the smallest ones. Keep them somewhat organized by size as you inflate them. This will make it easier when you start attaching them to the strip. You might even have a couple of different piles or bags for each size, which can be pretty helpful, actually. It just keeps things tidy and moves the process along more smoothly.
If you're using different colors, you might want to inflate them in batches of color as well. This way, you can easily grab the colors you need when you're assembling the arch, creating a nice pattern or a random mix, depending on what you prefer. It's all about making the assembly process as simple as possible for yourself, right?
Is There a Trick to Inflating Balloons Just Right?
There isn't really a single magic trick, but there are some good ways to make sure your balloons are inflated just right for your arch. The main idea is to avoid making them too tight. When a balloon is inflated to its absolute maximum, it becomes very rigid and round, almost like a perfect sphere. This isn't ideal for an arch, as a matter of fact.
Instead, aim for a slightly softer, more pear-shaped balloon. When you inflate it, stop just before it feels completely taut. You should be able to gently press on the sides and feel a little bit of give. This flexibility allows the balloons to nestle together more closely on the strip, creating a fuller look with fewer gaps. It also helps them withstand the pressure of being squeezed together without popping, which is pretty important, honestly.
For consistent sizing, especially with balloons of the same supposed diameter, you can use a balloon sizer. This is a simple box with holes cut out in various sizes. You inflate your balloon and then push it through the appropriate hole. If it fits without forcing, it's the right size. If it's too big, you let out a little air. This helps keep all your balloons uniform, which can make your arch look very neat and orderly, if that's the look you're going for, you know.
If you don't have a sizer, you can just eyeball it. Inflate a few balloons of the same size and compare them to each other. Try to make them roughly the same. This might take a little practice, but you'll get the hang of it pretty quickly. It's really about getting a feel for the balloons themselves, sort of.
Assembling the Basic Structure of Your Balloon Arch
Now comes the part where your arch really starts to take shape. You've got all your balloons inflated, and they're waiting to be put together. Grab your balloon decorating strip. You'll notice it has small holes or slots along its length. These are what you'll use to attach the balloons, and it's surprisingly simple, actually.
Start with your largest balloons. Pick one and find the knotted end. You'll thread this knotted end through one of the larger holes or slots on the strip. Then, pull it through so the knot is securely held by the strip. You might need to wiggle it a bit to get it to stay put. The goal is for the balloon to be firmly attached and not easily slip out, you know?
Continue adding balloons, alternating between sides of the strip if you like, or just working your way down. The key is to push the balloons close together once they're on the strip. You want them to be snug against each other, almost squishing a little. This creates that full, dense look that makes an arch so impressive. Don't be afraid to really pack them in there, as a matter of fact.
As you add more balloons, you'll see the strip start to curve naturally. This is what gives the arch its lovely shape. You can mix your balloon sizes as you go, placing larger ones as your main anchors and then filling in with medium ones. This helps build a good base for your arch, you know?
If you find a balloon isn't quite staying where you want it, you can use a small piece of clear tape or a glue dot to secure it to a neighboring balloon. This is especially helpful for those balloons that seem to want to point in the wrong direction. It's all about making it look cohesive and neat, right?
How Do You Attach Balloons to the Strip?
Attaching balloons to the strip is pretty straightforward, but doing it effectively makes all the difference in the final look of your how to make a balloon arch project. The balloon strip typically has two types of holes: larger ones for inserting the balloon knot and smaller ones for securing it. You'll mostly use the larger holes for the main attachment, basically.
Take an inflated balloon and locate the small tail where you tied the knot. Push this knotted tail through one of the larger, circular holes on the strip. Once it's through, slide the knot into the narrower slot that usually extends from the hole. This slot is designed to grip the knot tightly, preventing the balloon from slipping back out. It's a clever little design, honestly.
Repeat this process, adding balloons one by one. You'll want to place them fairly close together, alternating the direction of the balloon's body if you want a more organic, less uniform look. Some people like to place balloons on both sides of the strip, while others prefer to keep them on one side and then fill in. It's really up to your personal preference and the look you're trying to achieve, you know.
As you add more balloons, gently push them together along the strip. This creates a dense cluster, which is key to a full-looking arch. If you leave too much space between balloons, your arch might look a bit sparse or gappy, and that's not what we're going for. The idea is to make it look like a continuous flow of color and shape, that's for sure.
For any smaller balloons or accent pieces, you can use glue dots or low-temperature hot glue. These are great for filling in tiny gaps or adding extra pops of color and texture. Just apply a small dot of glue to the base of the smaller balloon and press it onto a larger balloon in the arch. This really helps to give your arch a professional, finished appearance, actually.
Shaping and Setting Up Your How to Make a Balloon Arch
Once you have all your balloons attached to the strip, you'll have a long, somewhat flexible garland of balloons. Now comes the exciting part: giving it that signature arch shape and getting it set up in its spot. This step can be a bit easier with an extra set of hands, so if you have a helper nearby, it might be a good time to ask for some assistance, you know?
The balloon strip itself is quite flexible, which allows you to bend and mold it into the curve you desire. You can make it a wide, gentle curve, or a tighter, more dramatic arc, depending on your space and what you like. Gently bend the strip, guiding the balloons into the shape you want. Be careful not to bend it too sharply, as this could put too much pressure on the balloons and cause them to pop, which would be a bit of a shame.
To secure your arch, you'll need something to attach it to. This could be a wall, a doorway frame, a pre-made arch stand, or even strong command hooks. Use fishing line, clear string, or zip ties to carefully attach the ends of your balloon arch to your chosen anchor points. Make sure it's secure enough to hold the weight of the balloons, but not so tight that it strains the balloons themselves, that's for sure.
If you're attaching it to a wall, command hooks are a really good option because they stick well and can be removed without damaging the paint. Place one hook where you want one end of your arch to start, and another where you want the other end to finish. Then, simply tie the balloon strip to these hooks. It's pretty straightforward, honestly.
Step back and take a look at your arch from a distance. Does the shape look right? Are there any gaps that need filling? This is your chance to make any final adjustments. You can gently push balloons around on the strip to redistribute them, or add a few extra smaller balloons with glue dots to fill in any sparse areas. It's all about achieving that full, celebratory look, you know?
Adding Those Extra Touches to Your Balloon Arch
Your balloon arch is almost complete, but those little extra touches can really make it shine and look truly special. This is where you can let your creativity run a bit wild and personalize your creation even more. Think about the overall theme of your event and what other decorative elements might complement your balloons, as I was saying.
You could add some artificial or real greenery, for example. Small sprigs of eucalyptus, fern leaves, or even some faux flowers can be tucked into the gaps between balloons. This adds a lovely organic feel and a bit of elegance. Use floral wire or glue dots to secure these additions so they stay in place throughout your event. It's a very popular way to make balloon arches look even more impressive, actually.
Fairy lights are another wonderful addition, especially if your event will extend into the evening. Wrap a string of battery-operated LED fairy lights around the arch, weaving them through the balloons. When lit, they create a magical, glowing effect that really makes the arch stand out. It's a simple addition that has a big impact, you know?
Consider adding some themed elements. For a baby shower, you might attach small baby-themed cutouts or tiny plush toys. For a birthday, perhaps some glittery numbers or letters spelling out a name. These personalized touches make the arch unique to your celebration and show that you put some extra thought into it, which is pretty nice, honestly.
Ribbons or streamers can also be woven into the arch or hung from it. Choose colors that match your balloon palette for a cohesive look. You can tie them in bows or let them hang freely, creating a playful movement. These small details might seem minor, but they really elevate the overall appearance of your how to make a balloon arch project, giving it that finished, polished look, you know?

Detail Author:
- Name : Florida Stiedemann
- Username : lehner.vena
- Email : mable.bashirian@champlin.com
- Birthdate : 1989-11-03
- Address : 5912 Veda Manors Lake Patrickchester, IL 80576
- Phone : +1.747.237.1481
- Company : Aufderhar Inc
- Job : Vending Machine Servicer
- Bio : Officiis reiciendis dolor omnis ullam rerum. Nam tenetur in veniam est. Incidunt distinctio cupiditate quas ea minus.
Socials
tiktok:
- url : https://tiktok.com/@mustafazulauf
- username : mustafazulauf
- bio : Sint placeat cupiditate ratione fuga blanditiis.
- followers : 4707
- following : 1427
instagram:
- url : https://instagram.com/mustafa_xx
- username : mustafa_xx
- bio : Asperiores accusantium fugiat exercitationem. Et quis saepe tempora ea.
- followers : 4596
- following : 2258
facebook:
- url : https://facebook.com/mustafa.zulauf
- username : mustafa.zulauf
- bio : Voluptatem tempora sed repudiandae eaque quis quis autem neque.
- followers : 1981
- following : 1424
linkedin:
- url : https://linkedin.com/in/mustafa.zulauf
- username : mustafa.zulauf
- bio : Cumque ut maiores voluptatum aut.
- followers : 4833
- following : 2475
twitter:
- url : https://twitter.com/zulauf1998
- username : zulauf1998
- bio : Aut et labore facilis quia tempore. Fuga sed veniam adipisci. Quia aut optio cum. Mollitia nostrum sed omnis a architecto totam et.
- followers : 1917
- following : 2603
