Learning about your sewing machine, so you know, really helps make your projects turn out just right. One thing that truly makes a difference, in a way, is where the needle sits. It’s a small detail, yet it plays a very big part in how your stitches look and how well your machine works. Getting a good feel for this can, you know, help you avoid a lot of little frustrations and make your sewing much more enjoyable.
You see, that slender piece of metal, the one that goes up and down, that’s your sewing machine's heart, in some respects, for making stitches. Its job is to push thread through fabric, creating those neat lines we all want. But, actually, it’s not just about having a needle; it’s about having it exactly where it needs to be. A slightly off needle placement can lead to all sorts of issues, like skipped stitches or fabric bunching up, which, frankly, nobody wants when they're trying to create something lovely.
This guide will walk you through, more or less, everything you might want to know about how your needle sits in the machine. We'll explore what a needle actually is, how its position affects your work, and how you can make little adjustments for better results. It’s all about helping you feel more confident with your machine and, basically, getting those stitches to look just like you pictured them.
- Club De Hombres Para Mujeres
- Kevin Nair Hair Removal Video Unblurred
- Yo Bob Fye
- Unc Get It In
- Scott Galloway On The View Today
Table of Contents
- What Exactly is a Sewing Machine Needle?
- Why Does Needle Position on Sewing Machine Matter So Much?
- Adjusting Your Needle Position on Sewing Machine - When and How?
- Common Issues with Needle Position on Sewing Machine - Are You Seeing Problems?
- Tips for Perfect Needle Position on Sewing Machine for Various Fabrics
- Keeping Your Needle in Good Shape - A Quick Look at Needle Care
- A Look at Different Needle Types and Their Ideal Needle Position on Sewing Machine
- What if Your Needle Position on Sewing Machine Feels Off?
- Summary
What Exactly is a Sewing Machine Needle?
When we talk about a needle, we're really talking about a small, slender tool, usually made of steel, that has a hole for thread or surgical stitches at one end. It’s what you use for sewing, you know, to join things together. The very earliest needles, for instance, were just bone or wood, pretty simple things, but they got the job done. Over time, they’ve changed a lot, becoming more refined for different tasks.
A needle isn't just for sewing fabric, though. It can be a very thin piece of plastic or metal that you use for knitting, often in pairs, like Vera's knitting needles that clicked away. Or, actually, it can be a circular needle, which holds two ends. Then there are specialized ones, like acupuncture needles in alternative medicine, or hypodermic needles, which are hollow and used with a syringe to put fluid into or take fluid out of a body. Surgical needles are also a thing, with several types for different medical needs. Even phonograph records use a slender piece of jewel or steel to pick up sounds, which is kind of cool, if you think about it.
For our purposes, though, we’re focusing on the kind that helps us make clothes or quilts. This sewing machine needle, in particular, is a thin, pointed piece of metal, typically with a hole, called an eye, at one end. It’s truly designed to stitch materials together, and its specific shape and features are what make it work so well in a machine, you know, for sailmaking or even tapestry work.
- I Think Theres Someone Hanging There
- Blue Collar And Scrubs
- Jayda Wayda Braids
- Bethenny Frankel Lashes
- Dave Chappelle Faggot
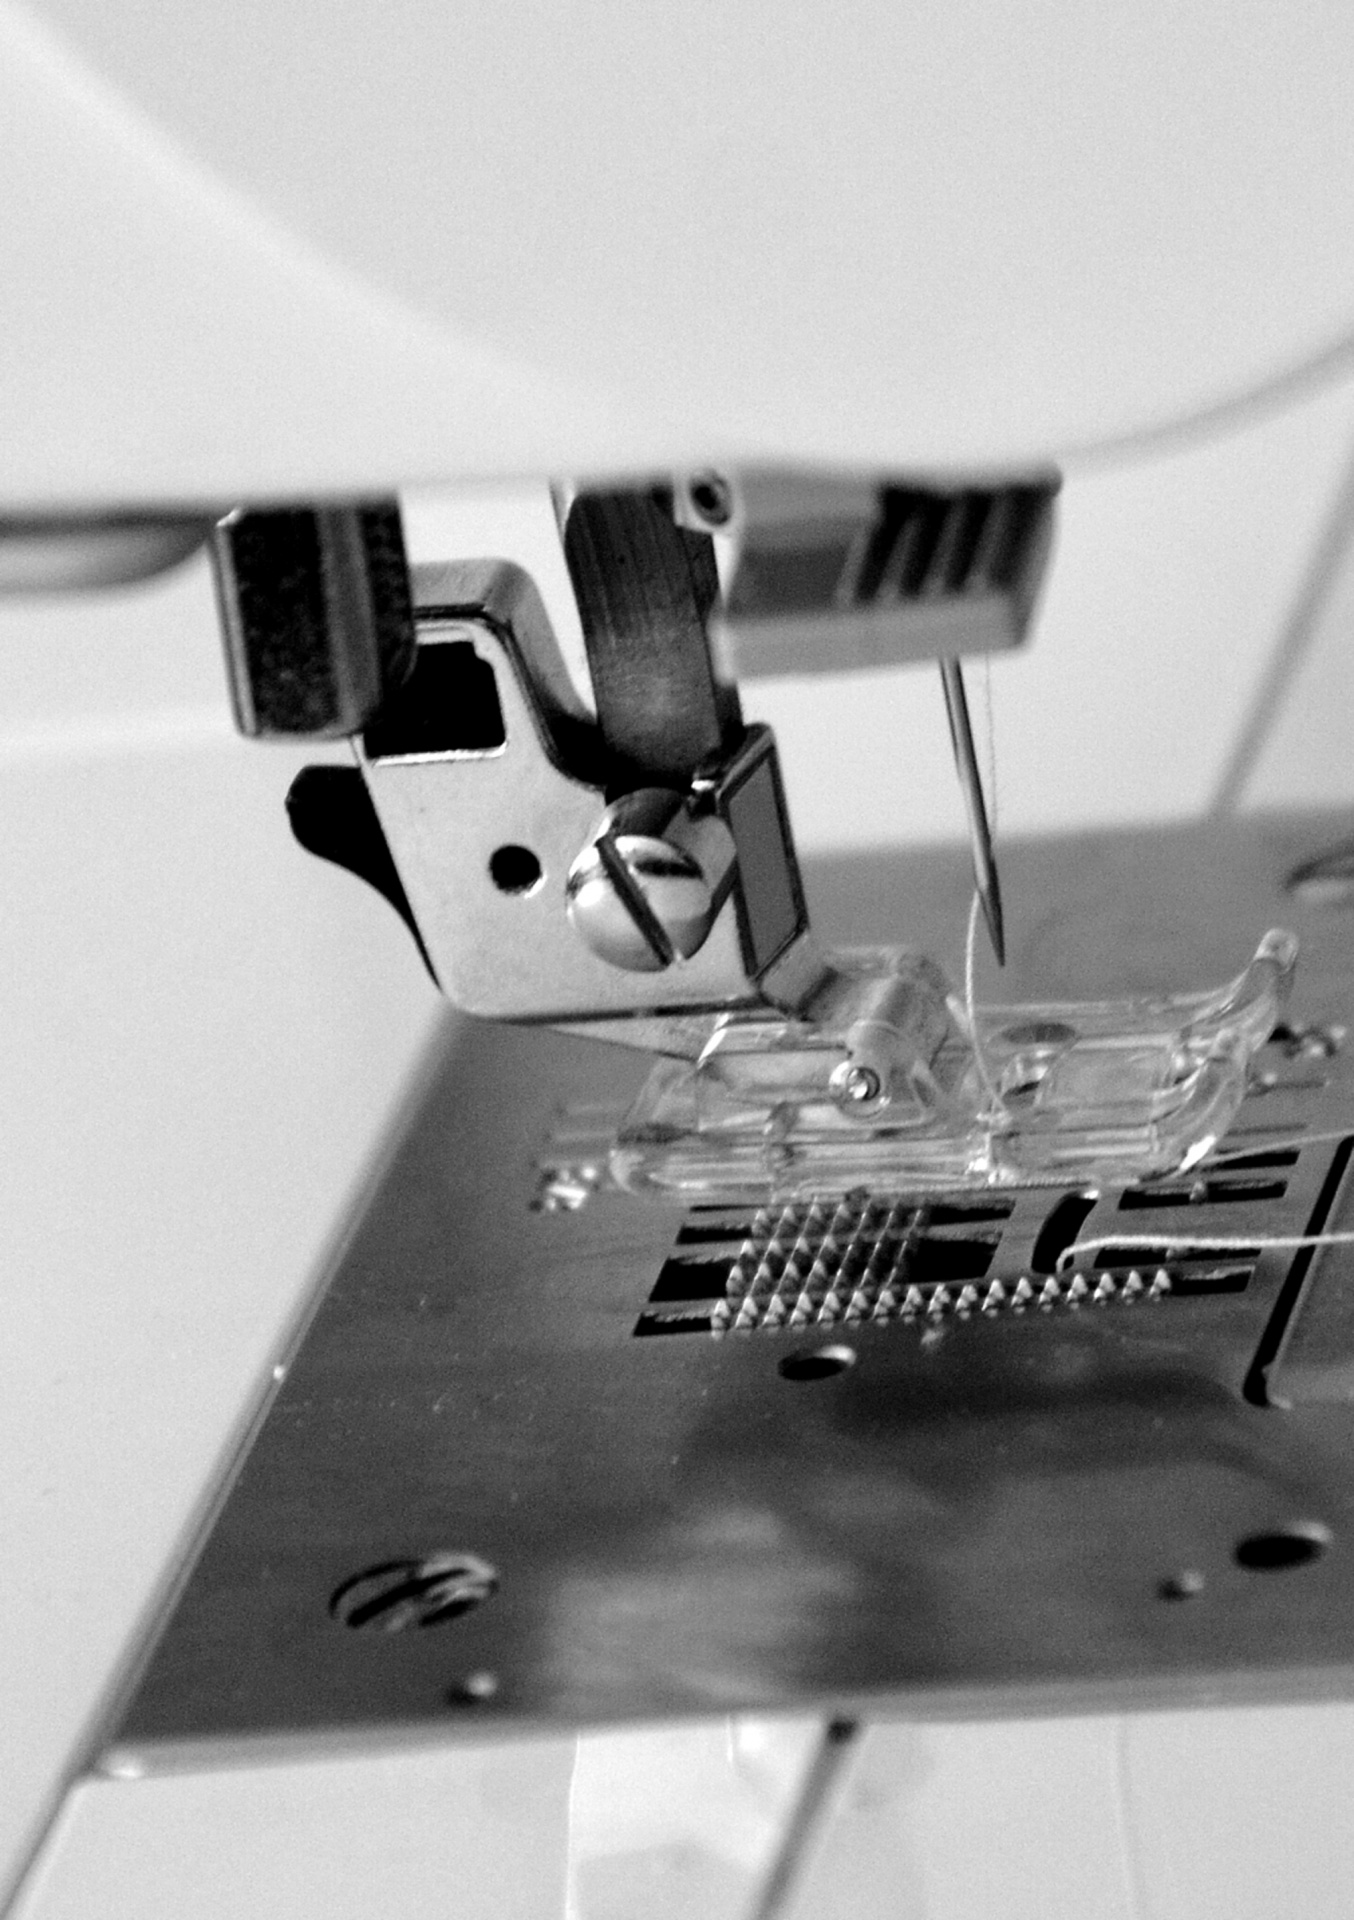
The Fine Point and the Eye - Essential Parts of a Sewing Machine Needle Position
Every sewing machine needle has a pointed end and, of course, an eye. The point is what pierces the fabric, and the eye is where your thread goes. These two parts, in some respects, work together to create a stitch. The way the point is shaped, and how the eye is placed, really matters for how the needle moves through different kinds of materials. For example, a sharp point might be great for tightly woven cotton, but a ballpoint might be better for knit fabrics, as it pushes fibers aside instead of piercing them.
The shank, which is the top part of the needle, is what fits into your machine’s needle clamp. It's usually flat on one side, which helps ensure the needle is inserted the correct way. This flat side typically faces the back of the machine, but it can vary, so checking your machine's manual is always a good idea. The proper placement of this shank, you know, directly affects the overall needle position on sewing machine, which then influences everything else about your stitch formation. If it's not seated all the way up, or if it's turned the wrong way, your stitches will definitely look off, or the machine might even jam.
Then there’s the groove, a little channel that runs down the front of the needle, and the scarf, a small indentation on the back. These features, though tiny, are actually very important for the thread to move smoothly and for the bobbin hook to grab the thread loop. If your needle isn't positioned correctly, these parts won't align with the machine's other components, and that, basically, can lead to all sorts of stitching woes. It's a bit like trying to open a door with the key turned the wrong way; it just won't work properly.
Why Does Needle Position on Sewing Machine Matter So Much?
You might wonder why we spend so much time talking about where a needle sits. Well, honestly, it’s because that little spot determines so much about your sewing success. Think of it like this: if a painter’s brush isn’t held just right, the stroke won’t be what they intended. Similarly, if your needle isn’t in its sweet spot, your stitches won't be even, strong, or pretty. It’s really that fundamental to the whole process, you know, of creating something with thread.
The exact spot where your needle goes down into the fabric affects how close your stitch line is to the edge, how wide your zigzag stitches can be, and even how well your fabric feeds through the machine. If the needle is too far to one side, for example, your seam allowance might be off, or your topstitching could look wobbly. It’s pretty much about precision, and a machine, as a matter of fact, relies on that precision to make those perfect little loops and knots that hold your fabric together. It’s a very coordinated dance between the needle, the thread, and the bobbin, and the needle’s starting point is key.
Also, a proper needle position helps prevent needle breakage. If the needle hits the presser foot or the needle plate, it can bend or snap, which is not only annoying but can also be a bit dangerous. So, keeping an eye on where your needle is, and making sure it's set up right, is a very simple step that can save you a lot of trouble and, you know, keep your machine running smoothly for a long time. It’s a small thing, yet it makes a very big difference, really.
How Does the Needle Position on Sewing Machine Influence Your Stitches?
The way your needle is placed, whether it’s centered, a bit to the left, or a bit to the right, directly impacts the quality and appearance of your stitches. For straight stitching, a centered needle position is typically the default and, you know, often the best for most general sewing. It gives you a good, even line right down the middle of your presser foot opening, which helps with consistent seam allowances. But, sometimes, you might want to move it.
When you're doing something like topstitching, where you want a stitch line very close to an edge, you might shift your needle position slightly. Moving it to the left or right can help you get that precise distance without having to constantly adjust your fabric by hand. This little adjustment, you know, makes it much easier to keep your stitches straight and parallel to the edge, which gives your project a very polished look. It’s a simple trick, but it really helps with accuracy, in a way.
For decorative stitches or zigzag stitches, the needle position is even more important. These stitches rely on the needle moving from side to side. If your initial needle position is off, the whole pattern will be off-center or uneven. Some machines allow you to adjust the starting point of these stitches, which can be super helpful for aligning patterns or getting a specific look. So, basically, knowing how to play with your needle position on sewing machine gives you more control over the final outcome of your creative work.
Adjusting Your Needle Position on Sewing Machine - When and How?
Most modern sewing machines have a setting that lets you change where the needle sits. It’s usually a button or a dial that allows you to shift the needle from left to right, or sometimes just to center, left, or right. This feature is really handy, and it's something you'll probably use more often than you think, especially as you get more comfortable with different sewing techniques. Knowing how to do this, and when, is a pretty useful skill to pick up.
To adjust it, you typically look for a button with a needle icon that shows it moving sideways, or a screen menu on computerized machines. You might have options for "L," "C," and "R" for left, center, and right, or a slider that gives you more precise control. As a matter of fact, some machines offer dozens of tiny increments, allowing for very fine-tuned adjustments. It’s a good idea to test it out on a scrap piece of fabric after you make an adjustment, just to see if it’s exactly where you want it. This way, you can avoid any surprises on your actual project, you know, which is always a good thing.
Remember, always make sure your needle is fully raised before trying to adjust its position. If the needle is down in the fabric or against the needle plate, trying to move it can cause it to bend or break. So, just raise it up, make your adjustment, and then you’re good to go. It's a simple safety step that can save you a lot of bother, really.
When Might You Want to Change Your Needle Position on Sewing Machine?
There are quite a few times when moving your needle from its default center spot can be super helpful. One common reason is when you're sewing with a specific seam allowance. If your machine's default center position doesn't give you the exact seam allowance you need with your chosen presser foot, shifting the needle can fix that. This is particularly useful for patterns that call for unusual seam allowances, so you know, you can keep everything very precise.
Another time you might adjust the needle is for edgestitching or topstitching. When you want a line of stitches right along the very edge of a fabric or a finished seam, moving the needle closer to that edge, perhaps to the left or right, helps you keep a perfectly straight line. It gives you a guide, in a way, and makes the whole process much easier than trying to eyeball it. This really helps with giving your projects a very professional, neat finish, which is something we all want.
Also, when you're attaching zippers, changing the needle position on sewing machine can be a lifesaver. Using a zipper foot often means the needle needs to be offset to one side or the other to stitch close to the zipper teeth without hitting them. So, basically, this adjustment allows you to get those nice, close stitches that make a zipper look well-installed. It’s a small thing, yet it makes a very big difference in how your finished garment looks, honestly.
Common Issues with Needle Position on Sewing Machine - Are You Seeing Problems?
Sometimes, even if you think your needle is in the right spot, you might run into problems. One very common issue is skipped stitches. If your needle isn’t lining up just right with the bobbin hook, it might miss grabbing the thread loop, leading to those annoying gaps in your stitching. This can happen if the needle is slightly bent, or if it’s not inserted all the way up into the needle clamp, which affects its overall needle position on sewing machine.
Another sign of a needle position problem could be your needle hitting the presser foot or the needle plate. This usually results in a loud thudding sound, or even worse, a broken needle. This happens when the needle is too far to one side, or if the wrong type of needle or presser foot is being used for the task. It's a clear signal that something isn't quite right with the alignment, and you should stop sewing immediately to check things out. It’s a safety thing, really, and it saves you from further frustration.
Uneven stitches or tangled thread on the underside of your fabric can also point to an issue with needle placement. If the needle isn't piercing the fabric cleanly, or if the thread isn't feeding through the eye smoothly due to a slight misalignment, it can mess with the tension and stitch formation. So, you know, if your stitches are looking messy, checking your needle’s position and condition is often a good first step in troubleshooting.
Troubleshooting Bad Needle Position on Sewing Machine
If you're having trouble with your needle position, there are a few simple things you can check. First, always make sure the needle is inserted all the way up into the needle clamp. Sometimes, it can feel like it’s in, but it’s not quite seated, and that slight difference can throw everything off. Push it up firmly until it won't go any further, and then tighten the screw. This is a very common fix for many stitch problems, you know, and it's super easy to do.
Next, check if the flat side of the needle shank is facing the correct direction. For most machines, this flat side goes towards the back. If it's turned even a little bit, the needle won't align properly with the bobbin hook, and you'll get skipped stitches or thread jams. So, just take it out and reinsert it, making sure it’s facing the right way. It’s a simple check, but it can make all the difference, honestly.
Also, take a very close look at the needle itself. Is it bent? Is the tip dull or broken? Even a tiny bend can cause big problems with the needle position on sewing machine. If it looks anything less than perfectly straight and sharp, just replace it. Needles are pretty inexpensive, and a fresh, straight needle can solve a surprising number of stitching issues. It’s a good habit to change your needle regularly anyway, perhaps after every few projects, just to keep things running smoothly.
Tips for Perfect Needle Position on Sewing Machine for Various Fabrics
Different fabrics sometimes need a little tweak to your needle's spot. For very fine fabrics, like silk or chiffon, you might find that a slightly finer needle, combined with a precise needle position, helps prevent snags and pulls. Sometimes, a very slight shift of the needle to the left or right can help you get a cleaner stitch line on these delicate materials, especially if your presser foot has a wide opening. It’s about finding that sweet spot where the needle pierces the fabric without causing any distortion, you know, which is key for delicate work.
When working with bulky fabrics, like denim or canvas, the default center needle position is usually fine, but you need to make sure your needle is strong enough for the job. A heavy-duty needle, with its stronger shank, will maintain its correct needle position on sewing machine even when pushing through multiple layers. If you're doing something like topstitching on denim, you might still want to shift the needle slightly to get a very neat line close to a seam, using the edge of your presser foot as a guide.
For stretchy knits, the right needle type (like a ballpoint or stretch needle) is more important than the exact position, but maintaining a consistent needle position is still vital for even stitches. These needles are designed to push fibers aside rather than pierce them, which helps prevent holes and skipped stitches. So, basically, once you have the right needle, making sure it’s in its proper place in the machine, and not bent, will help you get those smooth, stretchy seams you're looking for. It’s all about the combination of the right tools and their proper setup, really.
Keeping Your Needle in Good Shape - A Quick Look at Needle Care
Taking care of your sewing machine needles is a very simple way to ensure consistent needle position on sewing machine and overall stitching quality. A needle, like any tool, wears out over time. The point can get dull, or it can pick up tiny burrs that snag thread or fabric. A dull needle has to work harder to pierce the fabric, which can lead to skipped stitches, fabric damage, and even broken needles. So, you know, changing them regularly is a good practice.
How often should you change your needle? Well, it depends on how much you sew and what kind of fabric you’re working with. A general rule of thumb is to change it after every 8-10 hours of sewing, or after every major project. If you hear a popping sound as the needle goes through the fabric, or if you see little snags, it’s definitely time for a fresh one. It’s a pretty inexpensive part, so replacing it often is a very small investment for much better results.
When you're not sewing, it's a good idea to lower the needle into the needle plate or cover it with a needle guard if your machine has one. This helps protect the tip from accidental bumps that could bend or dull it. Also, store your spare needles in a container where they won't get jostled around. Keeping them safe and sound means they'll be ready to perform their best when you need them, which, honestly, makes sewing much more enjoyable.
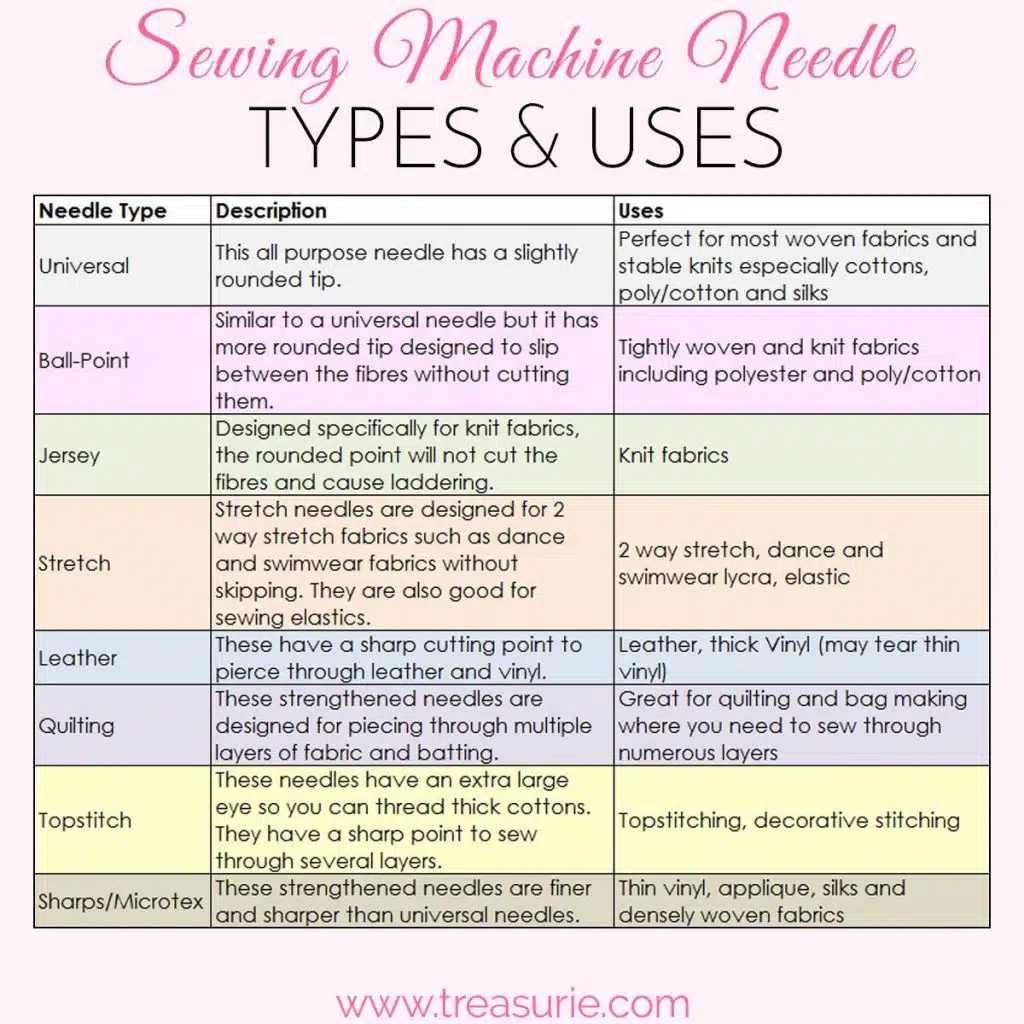
A Look at Different Needle Types and Their Ideal Needle Position on Sewing Machine
Just like there are different types of screws for different jobs, there are many kinds of sewing machine needles, each with a specific purpose. Understanding these types helps you pick the right one for your fabric, which in turn helps maintain the optimal needle position on sewing machine for that particular project. For instance, a universal needle is, you know, a good all-rounder for woven fabrics, and it typically works well with the machine's default center position.
Then there are specialized needles. A denim needle, for example, has a very strong, sharp point designed to penetrate thick, tightly woven materials without bending. A quilting needle has a slightly rounded point that’s good for piercing multiple layers of fabric and batting. For these,

Detail Author:
- Name : Aidan Orn III
- Username : viola.bartell
- Email : draynor@hotmail.com
- Birthdate : 1992-03-28
- Address : 3050 Stehr Plains Apt. 937 Lake Carolanneborough, MS 61902
- Phone : +17409167374
- Company : Bahringer, Conroy and Boyer
- Job : Hoist and Winch Operator
- Bio : Nesciunt saepe ut et qui assumenda magni consequatur quae. Libero nesciunt quo beatae labore aut. Alias ad consequatur explicabo voluptatem nemo. Hic non iusto rerum vero dignissimos maxime.
Socials
linkedin:
- url : https://linkedin.com/in/jenniemohr
- username : jenniemohr
- bio : Quam quidem et minima quod quas.
- followers : 5572
- following : 336
facebook:
- url : https://facebook.com/jennie_mohr
- username : jennie_mohr
- bio : Quidem nulla veritatis et quasi quidem.
- followers : 3708
- following : 1204
tiktok:
- url : https://tiktok.com/@jennie_official
- username : jennie_official
- bio : Eligendi ut tenetur et quo amet eligendi reprehenderit velit.
- followers : 681
- following : 1640
twitter:
- url : https://twitter.com/jenniemohr
- username : jenniemohr
- bio : Quia est praesentium quibusdam. Soluta nemo iste fugiat officiis voluptate voluptas. Officiis enim aut ea qui doloribus eveniet.
- followers : 4883
- following : 468
